understand layers
>
>
>
layers act as a stack of transparent sheets containing seperate pieces of content, enabling the user to manipulate the content within them without disturbing the contents of the other layers.
>
>
>
>
>
>
>
it can also be summoned in the Windows option from the menu bar, or with F7.
click the eye icon to toggle the visibility of each layer.
then, hold the option key while clicking the eye icon to isolate the layer.
>
>
>
>
>
then, use the Move tool to transform its contents.
holding shift while selecting layers will allow you to select and manipulate multiple layers at once.
step 1
step 2
step 3
step 4
step 5
learn layer basics
>
let’s explore a few of the most basic functions and commands of layers.
>
>
>
>
>
>
>
>
>
then, drag it below the layer you wish for it to sit under.
step 1: select a layer
step 2: create a new layer
step 3: double-click the layer’s name
step 4: rename the layer
to change a layer’s opacity, select a layer you wish to modify, then drag the Opacity slider at the top of the Layers panel. you can also enter the desired value in the Opacity value field.
to delete a layer, select it from the Layers panel and press the delete key.
clicking the
>
>
>
to name a layer, double click the layer’s name, then type the name you wish to use. hit the return key to finalize your changes.
step 1: paint in the new layer
step 2: click the opacity field
step 3: lower the opacity
step 4: select the layer
step 5: delete the layer
resize a layer
>
>
>
there are a number of ways to resize layers in photoshop.
>
>
>
>
>
>
>
to resize the layer, click and drag on any corner of the image, then realize to finalize the transformation.
press the shift key to constrain the aspect ratio of the layers as you perform the transformation so that they aren’t distorted.
you can also resize the contents of multiple layers at once by using the shift key to select them before transforming the layers.
step 1: select layer and free transform
step 2: transform
step 3: shift+ select multiple layers
repeat steps 1 & 2
add images to a layered design
>
>
>
>
>
>
>
>
then, go to the File menu, and choose Place Imbedded...
navigate to the downladable files folder, then select the Add_Images2.jpg file. click Place.
the image will appear in its own layer with diagonal crossbars on top of it.
>
>
this transformation can be performed at any time with the steps from the previous exercise in this module, resize a layer.
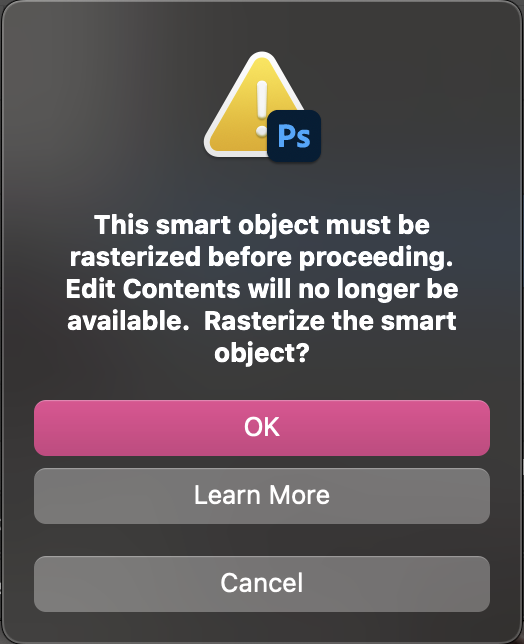
the resultant Smart Image will have a few constraints as to how you can modify them. Rasterize it to remove these contrainsts.
>
>
>
>
>
move the image by clicking and dragging.
press the return key to finalize.
unlock the background layer
>
>
>
background layers have special properties that disallow some of the routine manipulations that are performed on a typical layer.
>
> distinguishable by the lock icon next
to the title on the Layers panel
> constrained to the first layer of the
image
> attempting to rearrange or transform
yields no result
> can be converted into a regular layer by simply clicking the lock icon
>
>
>
>
>
>
>
>
>
first, create a new layer.
then, move the layer to the bottom of the layers in the Layers panel.
then, press the F5 key to summon the Fill tool. click the Contents field, then select from the drop-down menu. click OK.
you can make a new background layer by clicking the Layer menu, then selectiing New..., then selecting Background from Layer.
exercise from 2017 Adobe Creative Cloud Photoshop Tutorial Article Work with Layers. https://www.adobe.com/learn/photoshop/web/ps-layers-basics